Introduction to Sample Interface Service

Along with this project, I devised a sample interface service, and you can use it to familiarize how to play with ApiTestEngine.

This sample service mainly has two parts:

  • Authorization, each request of other APIs should sign with some header fields and get token first.
  • RESTful APIs for user management, you can do CRUD manipulation on users.

As you see, it is very similar to the mainstream production systems. Therefore once you are familiar with handling this demo service, you can master most test scenarios in your project.

Launch Sample Interface Service

The demo service is a flask server, we can launch it in this way.

1
2
3
4
$ export FLASK_APP=tests/api_server.py
$ flask run
 * Serving Flask app "tests.api_server"
 * Running on http://127.0.0.1:5000/ (Press CTRL+C to quit)

Now the sample interface service is running, and we can move on to the next step.

Capture HTTP request and response

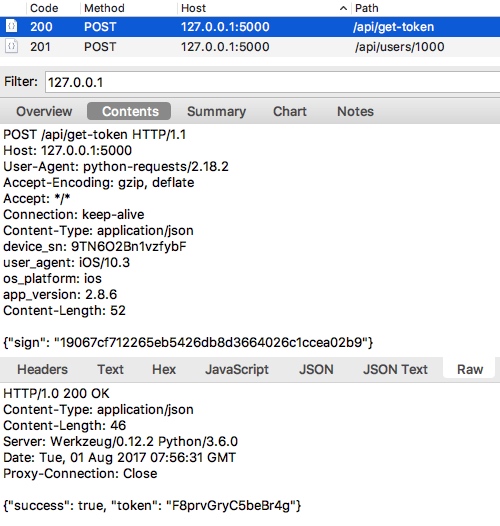
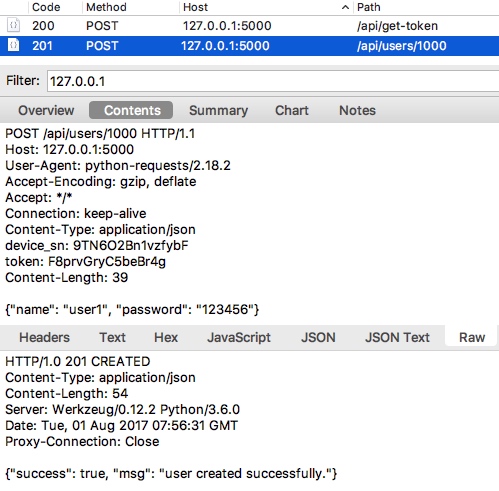
Before we write testcases, we should know the details of the API. It is a good choice to use a web debugging proxy tool like Charles Proxy to capture the HTTP traffic.

For example, the image below illustrates getting token from the sample service first, and then creating one user successfully.

After thorough understanding of the APIs, we can now begin to write testcases.

Write the first test case

Open your favorite text editor and you can write test cases like this.

 1
 2
 3
 4
 5
 6
 7
 8
 9
10
11
12
13
14
15
16
17
18
19
20
21
22
23
24
25
26
27
- test:
    name: get token
    request:
        url: http://127.0.0.1:5000/api/get-token
        method: POST
        headers:
            user_agent: iOS/10.3
            device_sn: 9TN6O2Bn1vzfybF
            os_platform: ios
            app_version: 2.8.6
        json:
            sign: 19067cf712265eb5426db8d3664026c1ccea02b9

- test:
    name: create user which does not exist
    request:
        url: http://127.0.0.1:5000/api/users/1000
        method: POST
        headers:
            device_sn: 9TN6O2Bn1vzfybF
            token: F8prvGryC5beBr4g
        json:
            name: "user1"
            password: "123456"
    validators:
        - {"check": "status_code", "comparator": "eq", "expected": 201}
        - {"check": "content.success", "comparator": "eq", "expected": true}

As you see, each API request is described in a test block. And in the request field, it describes the detail of HTTP request, includes url, method, headers and data, which are in line with the captured traffic.

You may wonder why we use the json field other than data. That’s because the post data is in JSON format, when we use json to indicate the post data, we do not have to specify Content-Type to be application/json in request headers or dump data before request.

Have you recalled some familiar scenes?

Yes! That’s what we did in requests.request! Since ApiTestEngine takes full reuse of Requests, it inherits all powerful features of Requests, and we can handle HTTP request as the way we do before.

Run test cases

Suppose the test case file is named as quickstart-demo-rev-0.yml and is located in examples folder, then we can run it in this way.

 1
 2
 3
 4
 5
 6
 7
 8
 9
10
11
12
13
14
ate examples/demo-rev-0.yml
Running tests...
----------------------------------------------------------------------
 get token ... INFO:root: Start to POST http://127.0.0.1:5000/api/get-token
INFO:root: status_code: 200, response_time: 48 ms, response_length: 46 bytes
OK (0.049669)s
 create user which does not exist ... INFO:root: Start to POST http://127.0.0.1:5000/api/users/1000
ERROR:root: Failed to POST http://127.0.0.1:5000/api/users/1000! exception msg: 403 Client Error: FORBIDDEN for url: http://127.0.0.1:5000/api/users/1000
ERROR (0.006471)s
----------------------------------------------------------------------
Ran 2 tests in 0.056s

FAILED
 (Errors=1)

Oops! The second test case failed with 403 status code.

That is because we request with the same data as we captured in Charles Proxy, while the token is generated dynamically, thus the recorded data can not be be used twice directly.

Optimize test case: correlation

To fix this problem, we should correlate token field in the second API test case, which is also called correlation.

 1
 2
 3
 4
 5
 6
 7
 8
 9
10
11
12
13
14
15
16
17
18
19
20
21
22
23
24
25
26
27
28
29
30
31
32
- test:
    name: get token
    request:
        url: http://127.0.0.1:5000/api/get-token
        method: POST
        headers:
            user_agent: iOS/10.3
            device_sn: 9TN6O2Bn1vzfybF
            os_platform: ios
            app_version: 2.8.6
        json:
            sign: 19067cf712265eb5426db8d3664026c1ccea02b9
    extractors:
        - token: content.token
    validators:
        - {"check": "status_code", "comparator": "eq", "expected": 200}
        - {"check": "content.token", "comparator": "len_eq", "expected": 16}

- test:
    name: create user which does not exist
    request:
        url: http://127.0.0.1:5000/api/users/1000
        method: POST
        headers:
            device_sn: 9TN6O2Bn1vzfybF
            token: $token
        json:
            name: "user1"
            password: "123456"
    validators:
        - {"check": "status_code", "comparator": "eq", "expected": 201}
        - {"check": "content.success", "comparator": "eq", "expected": true}

As you see, the token field is no longer hardcoded, instead it is extracted from the first API request with extractors mechanism. In the meanwhile, it is assigned to token variable, which can be referenced by the subsequent API requests.

Now we save the test cases to quickstart-demo-rev-1.yml and rerun it, and we will find that both API requests to be successful.

Optimize test case: parameterization

Let’s look back to our test set quickstart-demo-rev-1.yml, and we can see the device_sn field is still hardcoded. This may be quite different from the actual scenarios.

In actual scenarios, each user’s device_sn is different, so we should parameterize the request parameters, which is also called parameterization. In the meanwhile, the sign field is calculated with other header fields, thus it may change significantly if any header field changes slightly.

However, the test cases are only YAML documents, it is impossible to generate parameters dynamically in such text. Fortunately, we can combine Python scripts with YAML test cases in ApiTestEngine.

To achieve this goal, we can utilize import_module_functions and variables mechanisms.

To be specific, we can create a Python file (examples/utils.py) and implement the related algorithm in it. Since we want to import this file, so we should put a __init__.py in this folder to make it as a Python module.

 1
 2
 3
 4
 5
 6
 7
 8
 9
10
11
12
13
14
15
16
17
18
19
20
21
import hashlib
import hmac
import random
import string

SECRET_KEY = "DebugTalk"

def get_sign(*args):
    content = ''.join(args).encode('ascii')
    sign_key = SECRET_KEY.encode('ascii')
    sign = hmac.new(sign_key, content, hashlib.sha1).hexdigest()
    return sign

def gen_random_string(str_len):
    random_char_list = []
    for _ in range(str_len):
        random_char = random.choice(string.ascii_letters + string.digits)
        random_char_list.append(random_char)

    random_string = ''.join(random_char_list)
    return random_string

And then, we can revise our demo test case and reference the functions. Suppose the revised file named quickstart-demo-rev-2.yml

 1
 2
 3
 4
 5
 6
 7
 8
 9
10
11
12
13
14
15
16
17
18
19
20
21
22
23
24
25
26
27
28
29
30
31
32
33
34
35
36
37
38
39
- test:
    name: get token
    import_module_functions:
        - examples.utils
    variables:
        - user_agent: 'iOS/10.3'
        - device_sn: ${gen_random_string(15)}
        - os_platform: 'ios'
        - app_version: '2.8.6'
    request:
        url: http://127.0.0.1:5000/api/get-token
        method: POST
        headers:
            user_agent: $user_agent
            device_sn: $device_sn
            os_platform: $os_platform
            app_version: $app_version
        json:
            sign: ${get_sign($user_agent, $device_sn, $os_platform, $app_version)}
    extractors:
        - token: content.token
    validators:
        - {"check": "status_code", "comparator": "eq", "expected": 200}
        - {"check": "content.token", "comparator": "len_eq", "expected": 16}

- test:
    name: create user which does not exist
    request:
        url: http://127.0.0.1:5000/api/users/1000
        method: POST
        headers:
            device_sn: $device_sn
            token: $token
        json:
            name: "user1"
            password: "123456"
    validators:
        - {"check": "status_code", "comparator": "eq", "expected": 201}
        - {"check": "content.success", "comparator": "eq", "expected": true}

In this revised test case, we firstly import module functions in import_module_functions block by specifying the Python module path, which is relative to the current working directory.

To make fields like device_sn can be used more than once, we also bind values to variables in variables block. When we bind variables, we can not only bind exact value to a variable name, but also can call a function and bind the evaluated value to it.

When we want to reference a variable in the test case, we can do this with a escape character $. For example, $user_agent will not be taken as a normal string, and ApiTestEngine will consider it as a variable named user_agent, search and return its binding value.

When we want to reference a function, we shall use another escape character ${}. Any content in ${} will be considered as function calling, so we should guarantee that we call functions in the right way. At the same time, variables can also be referenced as parameters of function.

Optimize test case: overall config block

There is still one issue unsolved.

The device_sn field is defined in the first API test case, thus it may be impossible to reference it in other test cases. Context separation is a well-designed mechanism, and we should obey this good practice.

To handle this case, overall config block is supported in ApiTestEngine. If we define variables or import functions in config block, these variables and functions will become global and can be referenced in the whole test set.

 1
 2
 3
 4
 5
 6
 7
 8
 9
10
11
12
13
14
15
16
17
18
19
20
21
22
23
24
25
26
27
28
29
30
31
32
33
34
35
36
37
38
39
40
41
42
43
44
45
46
# examples/quickstart-demo-rev-3.yml
- config:
    name: "smoketest for CRUD users."
    import_module_functions:
        - examples.utils
    variables:
        - device_sn: ${gen_random_string(15)}
    request:
        base_url: http://127.0.0.1:5000
        headers:
            device_sn: $device_sn

- test:
    name: get token
    variables:
        - user_agent: 'iOS/10.3'
        - os_platform: 'ios'
        - app_version: '2.8.6'
    request:
        url: /api/get-token
        method: POST
        headers:
            user_agent: $user_agent
            os_platform: $os_platform
            app_version: $app_version
        json:
            sign: ${get_sign($user_agent, $device_sn, $os_platform, $app_version)}
    extractors:
        - token: content.token
    validators:
        - {"check": "status_code", "comparator": "eq", "expected": 200}
        - {"check": "content.token", "comparator": "len_eq", "expected": 16}

- test:
    name: create user which does not exist
    request:
        url: /api/users/1000
        method: POST
        headers:
            token: $token
        json:
            name: "user1"
            password: "123456"
    validators:
        - {"check": "status_code", "comparator": "eq", "expected": 201}
        - {"check": "content.success", "comparator": "eq", "expected": true}

As you see, we import public Python modules and variables in config block. Also, we can set base_url in config block, thereby we can only specify relative path in each API request url. Besides, we can also set common fields in config request, such as device_sn in headers.

Until now, the test cases are finished and each detail is handled properly.

Run test cases and generate report

Finally, let’s run test set quickstart-demo-rev-4.yml once more.

 1
 2
 3
 4
 5
 6
 7
 8
 9
10
11
12
13
14
15
16
$ ate examples/quickstart-demo-rev-4.yml
Running tests...
----------------------------------------------------------------------
 get token ... INFO:root: Start to POST http://127.0.0.1:5000/api/get-token
INFO:root: status_code: 200, response_time: 33 ms, response_length: 46 bytes
OK (0.037027)s
 create user which does not exist ... INFO:root: Start to POST http://127.0.0.1:5000/api/users/1000
INFO:root: status_code: 201, response_time: 15 ms, response_length: 54 bytes
OK (0.016414)s
----------------------------------------------------------------------
Ran 2 tests in 0.054s
OK

Generating HTML reports...
Template is not specified, load default template instead.
Reports generated: /Users/Leo/MyProjects/ApiTestEngine/reports/quickstart-demo-rev-0/2017-08-01-16-51-51.html

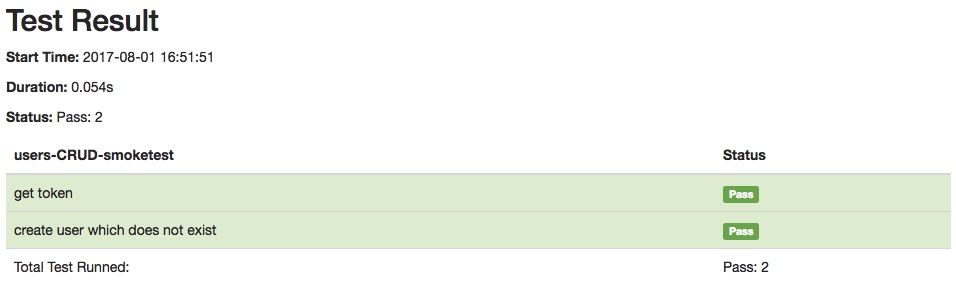
Great! The test case runs successfully and generates a HTML test report.

Further more

This is just a starting point, see the advanced guide for the advanced features.

  • templating
  • data extraction and validation
  • comparator